I’ve Been Busy Part 2

I had been reading about Looking Glass paint by Krylon and how it gives a  faux mercury glass look, which is all the craze on Pinterest these days.  No wonder…it is beautiful.

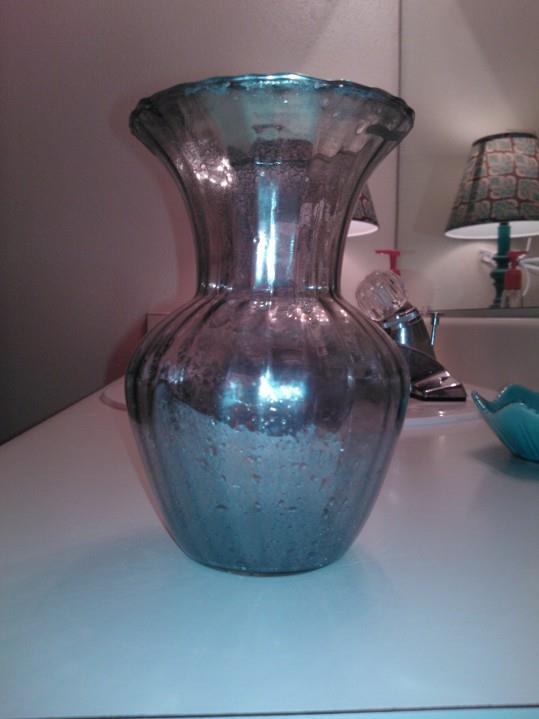
So I decided to try it out and see if it really works.  It did. It’s not a perfect match for mercury glass but the look I got was good enough for me.  Here’s my experimental project.  The vase was one of those clear vases that most people have 10 or 20 of somewhere in the house from having received fresh flower arrangements.  If you don’t have 10 or 20 of them you can buy them for .50 at most thrift stores.   The hydrangeas are from our yard this summer.  They’re my favorite.

vase  lampshade

Now that I felt confident in using the paint, my next project was to paint a couple of lamps for DD’s bedroom.  So off I went shopping at every thrift store I drove past.  I wanted a basic ginger jar lamp and didn’t want to invest more than $10 for both lamps.  I got these lamps for $2.50 each at Goodwill.  Score!

lamps before_after

Obviously, I had already started working on the lamp on the right when taking the picture above.  I was amazed at the ease of using this paint.  The finish I got is more of a mirrored finish rather than mercury glass but I don’t care.   I saved a bunch of money, considering all similar lamps that I’d found in discount stores like TJ Maxx, Marshall’s, etc., were a minimum of $40 each! Mere pennies to those at higher end stores where similar lamps were $150 or more.   Just not going to do that.  I paid a WHOLE LOT LESS for both lamps completely redone.

lamp

 Not too shabby. Don’t you love the lamp shade?  I definitely didn’t get it at Goodwill.

Next, I was on to painting a Moroccan design on a cheap rug that I already had.  It’s just a basic commercial grade rug that had only cost $20.  I figured if I completely messed this project up there wouldn’t be much of a loss since I’d been using the rug for the last year to cover some broken floor tiles in our kitchen. (Kitchen remodel in near future, thank goodness.)  To have spent the last year in our kitchen and to have been so inexpensive, the rug has held up very well and cleaned up superbly.  (Thanks to my dear husband and his power sprayer.)

The stenciling idea was inspired by a few projects I had seen on Pinterest.  I’m too cheap to pay $20 for a stencil.  So I found the design I liked online, printed it, cut it out using plastic cutting board material, and made my own “stencil.”  Then I found the center of the rug and eyeballed placing the center of the “stencil” on the center of the rug.  I then traced around the “stencil” with wet chalk.  Then, I painted over the chalk with white fabric paint, doing a little at a time.

Here it is in progress.

rug in progress

And the finished project…

rug2

rug1

You may notice some “smeared” places and that is just the chalk, which wiped away with a damp rag.  The rug definitely has its flaws but, for a first try and to be as inexpensive as it was, I’m not going to worry about them.

I found that sponging the paint on using a paint dauber, rather than a paint brush, was much easier.  (That’s what I call it, at least…a little stick with a round sponge on the end.)  I worked on the rug a couple of hours over three evenings; so the entire project took around 6 hours.  Considering these rugs cost $59 and up depending on the quality, I was quite happy with the result.  My expense was a $2 bottle of white paint and a $4 package of daubers.  And the rug, of course, I already had.  Not bad!  And here’s the semi-finished room that these projects that have kept me so busy have gone into.  I still have a bit of decorating to do but I like how it’s shaping up.

finished room

I’ve Been Busy

I started this post a couple of days ago when it was still two weeks away from Christmas but saved it as draft until I could get some pictures uploaded to my ancient computer.  I started to post as is tonight, clearly less than two weeks away from Christmas.  But I’m too OCD to not put things straight.  Haha.  I have now, btw, started the decorating.

Now the original post…

I can’t believe Christmas is two weeks away.  Ack! I haven’t done much shopping and I haven’t put one decoration out at our home.  That’s because I haven’t been home in two weeks! I had to return to my out-of-town job the Friday after Thanksgiving because we were having our largest fundraiser on Saturday.  So much for a four day weekend.  That hurts, but it especially hurts when your real home is three hours away.  Thankfully, I have this weekend to dress our home in lights and other Christmas spirit.

Leading up to Thanksgiving, I was so busy getting the daughter’s bedroom remodeled.  First the packing and painting (that started in March…just a mere 8 months earlier…yeah, I do that sometimes), then more painting when, after our third gallon of paint didn’t match the first two, we had to paint ALL OVER again.  Grrrrrr.  Then the fun began with all the crafty DIY stuff I wanted to make.  It makes me happy that I can put my Pinterest hours to work.

Image

I just love this.  It started as an old gold picture frame with double matting in green and burgundy.  It had contained a fruit bowl picture and I  had really liked the picture when I got it way back in the 90’s.  Shew! Can we say outdated? But look at it now.  I love repurposing!

Image

 I spray painted the frame platinum and the mat white, then covered the cardboard that the picture had been secured to with this beautiful fabric that I just fell in love with.  I’m going back for more to make cushion covers.  The “K” is of press board and is available at most craft stores.  I painted it white.  It took about a million layers of paint to coat it because the press board is so absorbent.

Another project I did for the room was refinishing this old night stand that I found at a thrift store for, get this…$13!!  I love bargains like that! It’s a great piece of furniture, solid wood and dove tail drawers.

night stand before

This was taken after I started sanding.  My first plan was to paint and distress the entire piece.  Then I decided to paint the body but stain the top.  And that, of course, meant completely sanding all of the stain and varnish from the top while the body only needed a light sanding.  My husband felt sorry for me after telling him how hard I worked sanding the top and he went out and bought me an electric sander. 🙂

night stand finished

Here it is.  It’s not perfect but it works for me.  I bought new glass handles at the hardware store.  I had the paint and varnish to refinish this piece so the only additional cost outside the $13 that I paid for it was around $16 for the handles.

Have you worked on any repurposing projects lately?

Full Circle

Well, two weeks into blogging and I’ve already broken a cardinal rule: posting regularly.  It’s been over a week since my last post.  It’s not that I haven’t wanted to write; I have.  It’s not that I didn’t have anything to write about; I have.  It’s not that I didn’t try new recipes to share; I have.  They just weren’t fabulous success stories.  Tasty, most of them, but not pretty. Not worthy of taking pics to brag about them.  I was also a little preoccupied with a house project and had my daughter and her fiancee visiting for the weekend.  Okay, enough excuses.

Last week I took a couple of days off from work to begin the arduous process of turning my 27 year-old daughter’s bedroom, finally, into an adult bedroom sans stuffed animals, movie posters, and especially sans the blinding bright yellow walls that she painted when she was 16.  It took some time for her to accept that all this change needed to happen.  I think the fact that she’s about to graduate from law school in a few weeks might have had an impact on her agreeing, even if half-heartedly, that it was time.

Once I started, it was more emotionally daunting than I expected for me, too.  There’s no denying or running from it, though.  My kids are grown.  Which makes me the mother of grown kids.  Adults.  The day has come.  Full circle, you might say.  My babies have all flown the nest.

Enough of that mush, lest I make myself cry.  I have a great plan for making her bedroom a very comfortable, inviting, and attractive space.  It may take 6 months for me to get around to completing it but at least I’m on my way.  Don’t judge me, remember that I work out of town throughout the week and spend 6 hours on the road each weekend.  My energy level sometimes feels near deplete.

So while the kids (I’ll always call them that, no matter their age) were home, we had fish tacos one night.  Have you ever had fish tacos?  When I first heard of them I thought, “Ewww.”  They’re pretty darned good, though.  I didn’t care too much for the recipe we used (sorry, Keke) but I’m eager to try making them again sometime soon using a different recipe.  The best part of the meal was the black bean and roasted corn salad that I made as a side.

This salad was such a simple, easy, and healthy dish.  If you’re following a low carb eating plan, this may or may not be for you.  I am not eliminating or severely limiting carbs, I get them through fruits and vegetables rather than bread, pasta, rice, and potatoes.  Yes, I know…corn and beans are higher carb vegetables but they are complex carbs so I have them in moderation.  And look at this lovely roasted corn.  It would have made a delicious dish all by itself.

Image

Sweet little kernels of caramelized yum.

To roast the corn, put it in a bowl, drizzle the olive oil over it, toss some salt and pepper in and spread it on a baking sheet.  Then roast at 400 degrees for about 20 minutes.   Let it cool before adding to the salad.

Black Bean and Roasted Corn Salad

1 can of drained and rinsed black beans

10 oz frozen corn

1 medium red bell pepper, chopped

5 green onions, sliced

1  lime, juiced (to taste)

1 TBSP olive oil

Salt and pepper to taste

Just put it all in the bowl, allowing the corn to cool first, then mix and eat!  Drizzle a little olive oil over it, if you’d like.

Black Bean Salad

There are a lot of variations you can make with the salad.  Some cherry tomatoes would have been nice…a little cumin and/or garlic…a little grated cheese.  I wanted to add diced avocado but Wal Mart was all out.  Imagine that, Wal Mart being out of something.  Happens all the time at the Wal Mart in my hometown.  Grrrr…

Another recipe I tried a few days ago was diet candy.  Diet candy?  Isn’t that an oxymoron?  Well, it isn’t diet in the sense of calories.  However, it is healthy candy that is low carb, without sugar, and fits nicely into my eating plan that must accommodate a sweet tooth.   Think Mounds candy bar.  My inspiration came from one of my favorite recipe blogs, Chocolate Covered Katie: http://chocolatecoveredkatie.com/2012/10/30/healthy-mounds-bars/.

Take a trip over to her blog and see a picture of it for yourself.  Believe me, while mine tastes pretty darned good and satisfies the sweet tooth, it didn’t turn out pretty at all because the melted dark chocolate chips seized and therefore was just globbed on top of the coconut layer.  Doesn’t stop me from eating it, though. 😀